This article shows how to authenticate with the Dropbox API through OAuth from a React Native application.
Start by creating the project:
react-native init DropboxOAuthSampleTo authenticate with the Dropbox API, the operating principle is the following:
- We will use React Native's
Linkinglibrary so we can open the browser on the Dropbox authentication page. - Then we will also use
Linkingso our application can be opened from a specific URL.
So, when we click the button to authenticate in the application, the browser opens and asks us for our authentication information. Once authenticated, the browser sends us back into the application while passing the token that we will later use with the Dropbox API.
Installing and Configuring Linking
The first thing to do is add the Linking library to our Xcode project. To do that, follow the instructions here.
Then add the following code in the AppDelegate.m file.
Below the other imports:
#import "RCTLinkingManager.h"Just after @implementation AppDelegate:
- (BOOL)application:(UIApplication *)application openURL:(NSURL *)url sourceApplication:(NSString *)sourceApplication annotation:(id)annotation {
  return [RCTLinkingManager application:application openURL:url sourceApplication:sourceApplication annotation:annotation];
}
Now that we have added the Linking library to our project, we will configure the URL that should open our application.
iOS:
Select the project, go to the Info tab, then to the URL Types section. Add a new type as shown in the screen below:
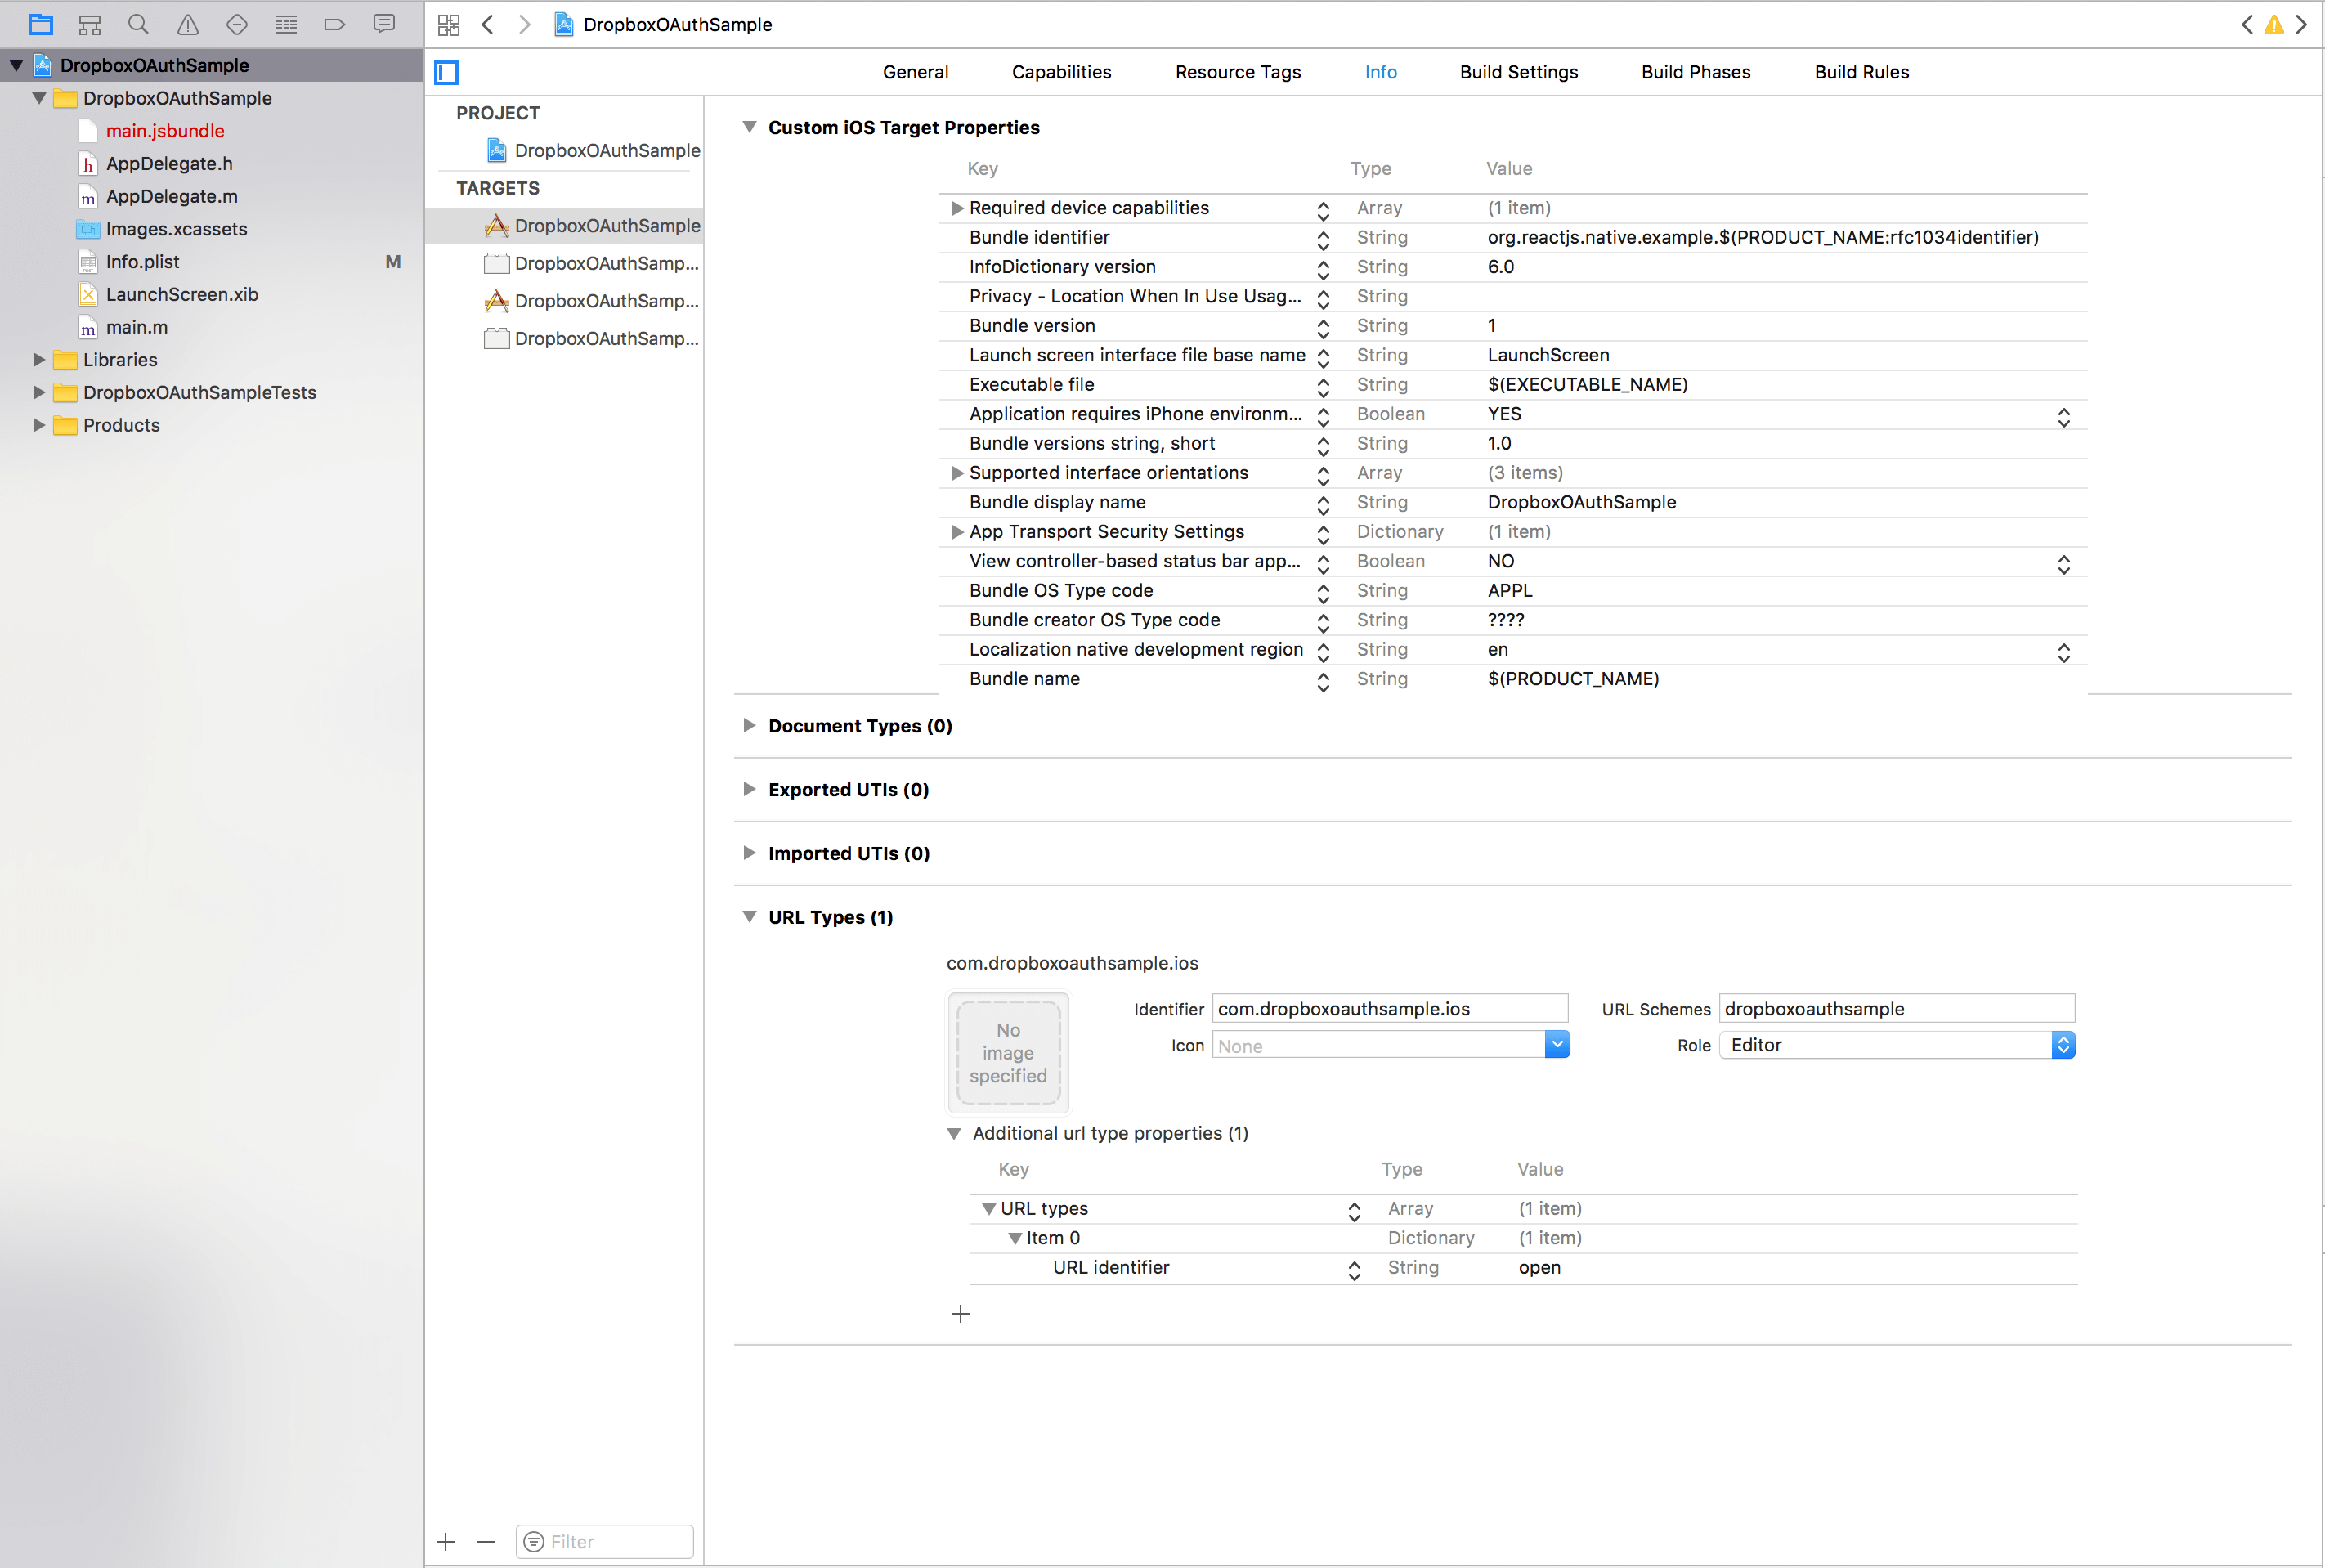
To check that Linking works correctly, run the application, then open Safari from the simulator and enter the following address: dropboxoauthsample://open. You should normally be prompted to open the application.
Android:
On Android, the configuration is different. We will modify the AndroidManifest.xml file.
First, add the following code in the file's activity section:
android:launchMode = "singleTask";This prevents a new Activity from being restarted when the application is opened through Linking.
Then add a new IntentFilter under the existing one. It will contain the information for the URLs accepted to launch the application.
<intent-filter>
    <action android:name="android.intent.action.VIEW" />
    <category android:name="android.intent.category.DEFAULT" />
    <category android:name="android.intent.category.BROWSABLE" />
    <!-- Accepts URIs that begin with "https://www.example.com/open” -->
    <data android:scheme="https"
        android:host="www.example.com"
        android:pathPrefix="/open" />
    <!-- note that the leading "/" is required for pathPrefix-->
    <!-- Accepts URIs that begin with "dropboxoauthsample://open” -->
    <data android:scheme="dropboxoauthsample"
        android:host="open" />
</intent-filter>
Creating the Dropbox Application
Now that we are done with the configuration, we need to create an application on Dropbox. To do that, go to the Dropbox developer platform and click Create app.
Then fill in the form as shown in the image below:
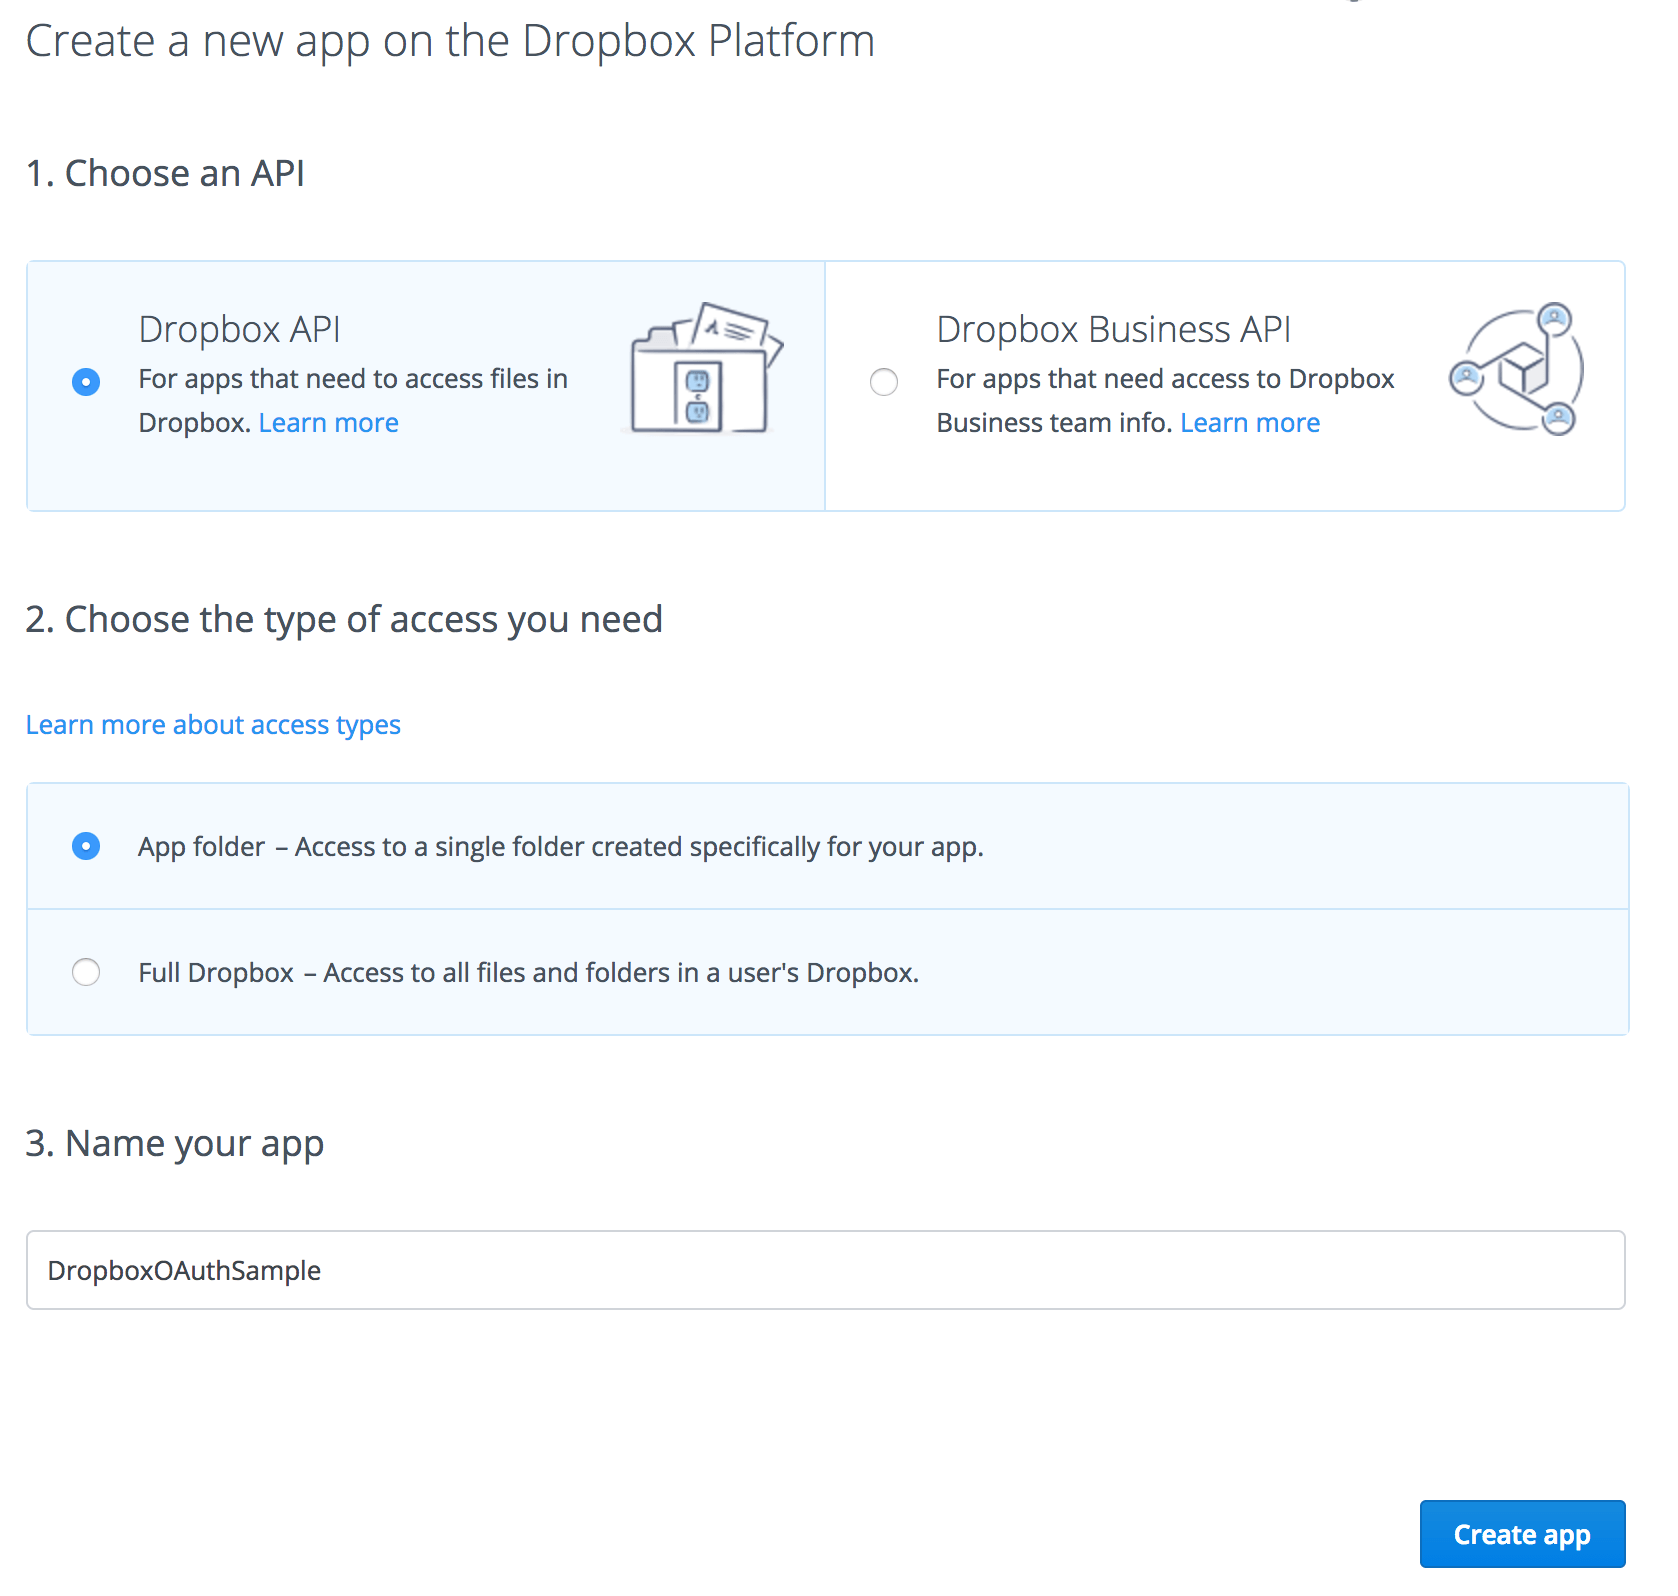
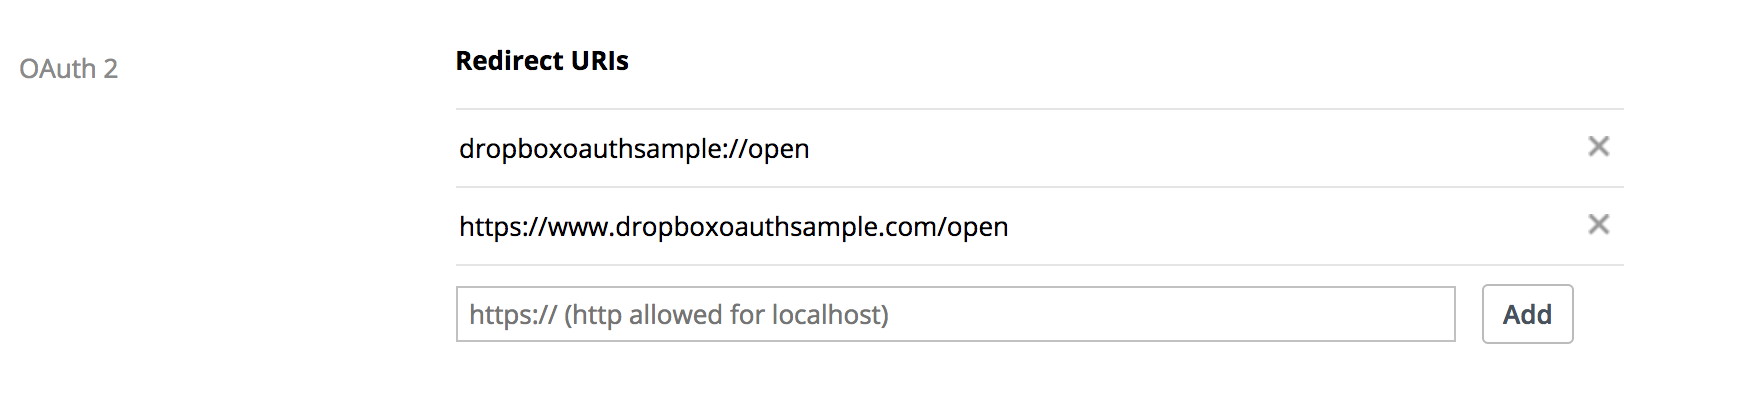
After your application is created, add the following URLs in the OAuth2 Redirect URIs section:
- dropboxoauthsample://open
- https://www.example.com/open
Managing Authentication in the React Native Application
We are now ready to manage authentication in our application. We will first create a src folder and add the index.js file:
mkdir src && cd src
touch index.js
Add the following code in the index.js file:
import React, { Component } from 'react'
import { StyleSheet, Text, View, Linking, Button, Platform } from 'react-native'

const DROPBOX_APP_KEY = 'YOUR_DROPBOX_APP_KEY'
import uuidV4 from 'uuid/v4'

export default class DropboxOAuthSample extends Component {
  constructor(props) {
    super(props)
    this.state = {
      isDropboxInit: false,
      apiToken: '',
      verification: uuidV4(),
    }
  }

  componentDidMount() {
    Linking.addEventListener('url', event => this.handleLinkingUrl(event))
  }

  componentWillUnmount() {
    Linking.removeEventListener('url', event => this.handleLinkingUrl(event))
  }

  handleLinkingUrl(event) {}

  loginWithDropbox() {}

  render() {
    const instruction = this.state.isDropboxInit
      ? 'Dropbox API token: ' + this.state.apiToken
      : 'You are not logged in yet'
    return (
      <View style={styles.container}>
        <Button title="Log in with Dropbox" onPress={() => this.loginWithDropbox()} />
        <Text style={styles.instructions}>{instruction}</Text>
      </View>
    )
  }
}

const styles = StyleSheet.create({
  container: {
    flex: 1,
    justifyContent: 'center',
    alignItems: 'center',
    backgroundColor: '#F5FCFF',
  },
  instructions: {
    marginTop: 32,
    textAlign: 'center',
    color: '#333333',
    marginBottom: 5,
  },
})
Here, first we import our React Native libraries, including Linking. Then we define our Dropbox app key, which can be found on the Dropbox application page. In the constructor, we define the initial state.
- isDropboxInit: determines whether we are connected to Dropbox.
- apiToken: the token returned by Dropbox after login.
- verification: a parameter passed to the Dropbox login URL.
Then we add an event listener for linking whose callback is the handleLinkingUrl method.
Next, we add the methods:
- loginWithDropbox: logs in to Dropbox.
- handleLinkingUrl: callback used when the application is opened through
Linking.
We will complete these methods later in the article.
Finally, replace the code in the index.android.js and index.ios.js files with this:
import React, { Component } from 'react';
import { AppRegistry } from 'react-native';

import App from './src';

AppRegistry.registerComponent('DropboxOAuthSample', () => App);
Now we will complete the loginWithDropbox method:
loginWithDropbox() {
  const redirect_uri = Platform.OS === 'ios' ? 'dropboxoauthsample://open' : 'https://www.example.com/open';
  const url = `https://www.dropbox.com/oauth2/authorize?response_type=token&client_id=${DROPBOX_APP_KEY}&redirect_uri=${redirect_uri}&state=${this.state.verification}`;
  Linking.openURL(url).catch(err => console.error('An error occurred', err));
}
In this method, first we define the redirect URL after login according to the platform. This is what lets us reopen the application after logging in. Then we build the login URL by passing the following parameters: the Dropbox app ID, the redirect URL, and the state variable, which takes the verification value defined in the constructor. Finally, we open the URL through Linking.
We use the state variable to close a security gap. It is possible for a malicious user to send our application a URL containing their own token instead of the application user's token. Without knowing it, our user could then send sensitive data directly to the attacker's account.
That is where the state variable comes in. It is generated randomly when the application starts, and whenever we receive a URL, it lets us check whether that URL is really the one generated by the application. If the value received from the URL is different from the one generated by the application, we do not save the token and we display an error message.
In the handleLinkingUrl method, we will need to parse the return URL. To simplify this step, we will use the shitty-qs library.
yarn add shitty-qsThen import shitty-qs:
import shittyQs from 'shitty-qs'Finally, add the following code in the handleLinkingUrl method:
var [, query_string] = event.url.match(/\#(.*)/)
var query = shittyQs(query_string)
if (this.state.verification === query.state) {
  this.setState({ isDropboxInit: true, apiToken: query.access_token })
} else {
  alert('Verification does not match')
}
Here, we parse the parameters from the return URL, then test that the state variable's value is equal to the verification value defined in the constructor. If everything is OK, we set the token value with the value returned by the URL.
Now you can use the API or the JS SDK with the token we just retrieved.